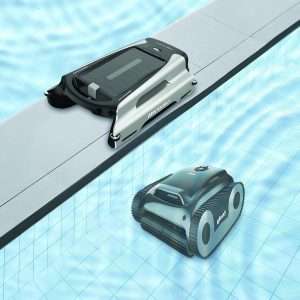
Proper maintenance of your robotic pool skimmer is essential for optimal performance and longevity. One important task is removing the faceplate for cleaning or servicing the internal components of the skimmer. This guide will walk you through the simple steps to safely and effectively remove the faceplate of your robotic pool skimmer.
Tools You Will Need:
- A screwdriver (usually Phillips or flathead, depending on the model)
- Soft cloth or towel (optional, for cleaning)
Step-by-Step Instructions:
- Power Off and Disconnect
Before beginning any maintenance, always ensure that the robotic pool skimmer is powered off and disconnected from any power source. This is essential to avoid electrical shock or damage to the unit. If your model runs on a rechargeable battery, ensure the battery is removed or turned off. - Locate the Faceplate Screws
The faceplate is usually secured by screws around its perimeter. Carefully inspect the front of the skimmer to identify these screws. The screws may be visible or hidden behind rubber gaskets or covers, depending on your skimmer model. - Loosen the Screws
Using the appropriate screwdriver, begin unscrewing the screws that hold the faceplate in place. Turn each screw counterclockwise to loosen. Be sure to place the screws in a safe location to prevent losing them. - Remove the Faceplate
Once all the screws are removed, gently pull the faceplate away from the skimmer. It may require some light wiggling or prying to detach, especially if there’s a rubber seal or adhesive around the edges. If you encounter resistance, check if any screws were missed or if the seal is sticking. - Inspect and Clean the Faceplate
With the faceplate removed, take the opportunity to inspect it for any damage or wear. If necessary, use a soft cloth to clean the surface of the faceplate, removing debris, dirt, or algae buildup. Be careful not to damage any seals or gaskets in the process. - Service Internal Components
This is also a good time to inspect the internal components of the skimmer, such as the motor, filters, or impellers. Clean any debris or buildup you find and ensure everything is functioning properly. - Reattach the Faceplate
After cleaning and servicing, carefully align the faceplate back onto the skimmer body. Make sure the rubber seal (if present) is properly aligned and intact. Secure the faceplate by tightening the screws back into place, turning them clockwise until snug. Be careful not to overtighten, as this could strip the threads or damage the faceplate. - Test the Skimmer
After reassembling the skimmer, power it on to ensure everything is working as expected. Check for any unusual noises or malfunctions. If everything appears to be in order, your robotic pool skimmer is ready to resume cleaning!
Tips:
- Always consult your user manual for specific instructions or warnings related to your particular model.
- Perform regular maintenance to extend the life of your robotic pool skimmer and ensure optimal performance.
- If you’re unsure about any step or encounter issues, don’t hesitate to reach out to a professional technician or the manufacturer’s customer service.
Removing and maintaining the faceplate of your robotic pool skimmer is a straightforward process that helps ensure your equipment continues to function at its best. Regular cleaning and maintenance can prevent clogs and damage, ensuring your skimmer operates efficiently for years to come.
You can adjust the tone or detail based on the specific audience or model of pool skimmer you’re focusing on!